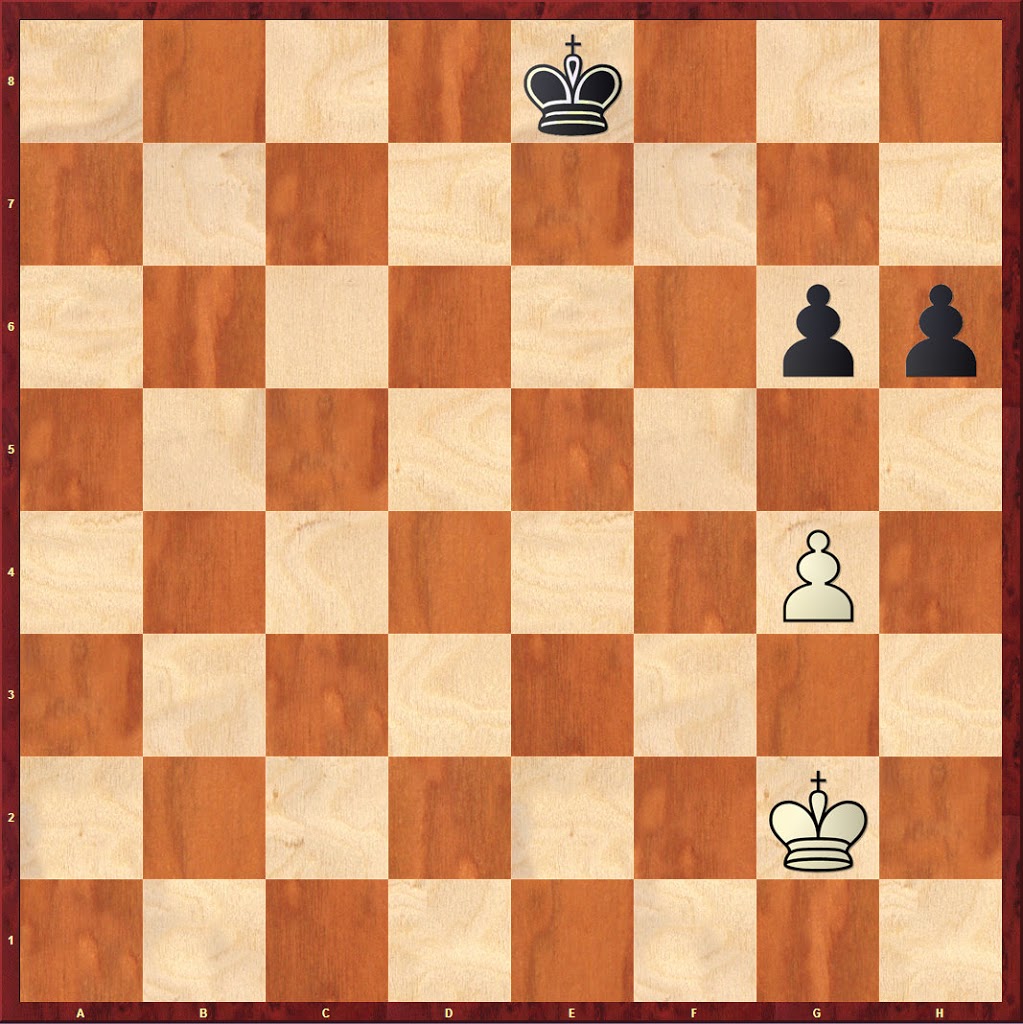
White to move. Is this a draw or loss for white? How should white proceed?
4k3/8/6pp/8/6P1/8/6K1/8 w – – 0 1
Chess Daily News from Susan Polgar

White to move. Is this a draw or loss for white? How should white proceed?
4k3/8/6pp/8/6P1/8/6K1/8 w – – 0 1
Material down pawn endgame is dead lost. Everyone knows this.
I think you never study endgames…
It’s a draw… Kf2 and you take the opposition!!!
Kf2 and the opposition is on!!! DRAW
1. Kf2 Kd7 0-1 🙂
Ladies and Gentlemen,
This is a tough one! For once, the most obvious move is the right start, but even then, the rest is still difficult.
Also, believe it or not, white will have a waiting move that can draw when he needs it.
Basically, in this sort of position white wants to get to the fourth/fifth rank and force black to either give ground with his king, or force black to move a pawn. If black moves the h-pawn, white exchanges down to a rook’s pawn ending that cannot be won. Now, obviously, black can prevent white from reaching the fifth rank by coming to the sixth rank himself. Let’s look at some lines in which black dawdles and allows the white king to reach rank 5:
1. Kf3! Kf7
2. Kf4 Ke7
3. g4
Here, white can draw with Ke5, too, but that conclusion will be discussed later in the main important line. Continuing:
3. …..h5
Here 3. …hg5 will draw quickly (if you recognize the pattern, you will know how to play it right down to the end), though I will leave some of the variations out of the analysis due to time constraints since they pretty much all reduce down, in the end, to the same conclusion: [3. …hg5 4.Kg5 Kf7 5.Kg4 Kf6 6.Kf4! g5 7.Kg4 Kg6 8.Kg3 Kf5 9.Kf3 g4 10.Kg3 Kg5 11.Kg2 Kf4 12.Kf2! g3 13.Kg2 Kg4 14.Kg1 Kf3 15.Kf1 g2 16.Kg1!=]. The point in demonstrating this line is to show how you draw this- you should be able to do this in your sleep. The opposition from behind the pawn is useless for black since it will repeat every time until the defender is stalemated on the back rank- he just has to take the opposition to the side each time (see moves 6, 9, 12, and 15 in the line above). Continuing from move 3 above:
4. Ke5
Here, white can take the longer range opposition, too (with Ke3), since black’s only waiting move will drop the h-pawn just like below. However, I will usually just take the direct opposition instead out of habit:
4. …..h4
Here, black can’t win with king moves either: [4. …Kf8 5.Kf4 long range opposition =]; or [4. …Kf7 5.Kf4 (black can’t take opposition here because of white’s pawn) 5. …Ke6 6.Ke4! h4 7.Kf4 h3 8.Kg3 h2 (or 8. …Kf5 9.Kh3! Kg5 10.Kg3! Kf5 11.Kf3! g5 12.Kg3 g4 13.Kg2 Kg5 (we saw 13. …Kf4 earlier) 14.Kg3 Kf5 15.Kg2=) 9.Kh2 Kf5 10.Kg2! Kg5 11.Kg3=]. The main point in these sidelines is that the h-pawn cannot be pushed and the white g-pawn won at the same time without allowing white the time to take the proper drawing positions with his king after it captures the h-pawn. Try it. Continuing from move 4 above:
5. Kf4 Ke6 (h3 similar to above)
6. Kg4!
An only move, I think: [6.Ke4?? h3! 7.Kf3 Kf5! 8.Kg3 Kg5! 9.Kh3 Kf4 10.Kg2 Kg4! 11.Kh2 Kf3-+]. Continuing:
6. …..Ke5 (h3 similar to above)
7. Kh4 Kf4 (Kf5 8.Kh3 Kg5 9.Kg3=)
8. Kh3 Kg5 (Kf3 9.Kh4=)
9. Kg3=
So, I am going to break this comment into two parts due to length. This first part is just to show one what white wants to do. In the next comment, I will cover what is the most critical line to show that even with the opposition, the black king cannot succeed in winning this after white has played 1.Kf3 because white can sacrifice the g-pawn for a waiting move.
So, in my previous comment, I started with 1.Kf3. The truth is that when I looked at this problem the first time, I suspected the obvious move was the wrong one, but it took me a few minutes to understand why my instinct was wrong. I didn’t realize at first that the critical position was still drawn. Let’s look at the most critical line:
1. Kf3 Kf7
This was my concern with white’s first move- black can take the longer range opposition- so, I was thinking if white moves to e4, black takes the direct opposition at e6, or at f6 if white plays Kf4 on the next move, but I was wrong:
2. Kf4
Here, white will lose with any other move, in my opinion: [2.Ke4 Ke6! 3.Kf4 Kd5 4.g5 (otherwise, the white king has to give ground and lose the g-pawn eventually) 4. …h5! 5.Kf3 Ke5 6.Kg3 Kf5 7.Kh4 Kf4-+]. And any other white king move is going to lose similarly. Continuing from move 2 above:
2. …..Kf6 (alternatives below)
3. g5+!
White’s surprising waiting move when black has the opposition! When I was studying this problem prior to getting out the chess board, I just assumed this line was lost, but it isn’t. Continuing:
3. …..hg5 (or allow gh6)
4. Kg4!
And no matter what the black king does, white wins the g5 pawn, and gets a drawing position, the method of which was contained in the variations I described in my previous comment, but I will make it explicit here to finish up this line:
4. …..Ke6
5. Kg5! Kf7
6. Kg4
Any move to the 4th rank will hold for white, this is just how I play it- by backing up on the file with the pawn. Continuing:
6. …..Kf6
7. Kf4
An only move for white! Continuing:
7. …..g5 (or make no progress)
8. Kg4
This position is so drawn, that white can make any legal move here. Again, this is just the way I play it. Indeed this entire setup is a classic drawn position. Continuing:
8. …..Kg6
9. Kg3 Kh5 (Kf5 10.Kf3=)
10.Kh3
Again, in this position, white must take the opposition, or lose the game. Continuing:
10. ….g4 (or make no progress)
11.Kg3 Kg5 and I will end here. This opposition repeats until the white king is on g1, the black king is on g3 with the pawn in between, and white to move- a stalemate.
So, to finish this, let’s look at black’s alternatives at move 2 to be sure that he had no winning lines. from the top:
1. Kf3 Kf7
2. Kf4 g5 (h5 3.gh5=)
3. Kf5
I think white draws with a lot of other moves, too, but this seems the most straightforward move. Continuing:
3. …..Kg7
4. Ke4!
Of white’s three possible moves, this is the only one that holds: [4.Ke6 Kg6 5.Ke5 h5 6.Ke4 (or 6.gh5 Kh5 7.Ke4 Kg4-+) 6. …hg4-+]; or [4.Ke5 Kg6 5.Ke4 h5 6.Kf3 h4! 7.Ke3 Kf6 8.Kf3 Ke5 9.Ke3 Kd5 and the white king has to give way since if white plays Kd3, the h-pawn will queen]. Continuing from move 4 above:
4. …..Kg6
I need to wrap this up, but other moves here are even less promising on first principles. Continuing:
5. Kf3
And now the white king has been pushed back, but he has accomplished one of the original goals- force black to move the g-pawn leaving the h-pawn backwards. From here, to make progress, black will be forced to exchange the h-for the g-pawn leading to dead draw we have seen before. Continuing:
5. …..h5
6. gh5 Kh5
7. Kg3 is drawn as we saw in my first comment and the sidelines. Or, at move 5 in this line:
5. …..Kf6
6. Kf2
White must avoid a move like Ke3: [6.Ke3?? Ke5! 7.Kf3 Kd4 8.Kg3 Ke3 9.Kg2 Kf4 10.Kh3 Kf3-+]. Continuing:
6. …..Ke5 (or make no progress)
7. Ke3!=
The main point of 6.Kf2, taking the direct opposition on move 7 by maintaining the long range opposition on move 6. And the kings can just move back an forth in front of each other for the draw.
I think I have fairly covered the major highlights of this position. There are numerous alternative lines here, but the all reduce, in the end, to the major themes here with proper play.
Very interesting endgame.
After 1. Kf3! draw.
If black takes the opposition, the White draw with:
1. Kf3 Kf7
2. Kf4 Kf6
3. g5+!
Best regards
Stef
White is to move, so it must be a draw.
After the key move, we are not so surprisingly into a study from Grigoriev, the wizard of pawn endgame studies (with other very serious contenders like Zinar, Bähr and Mandler)
Not so surprisingly for the specialists, as the main line unfolds, we find other names: Dedrle and above all a pioneer, Philip Van Zuylen Van Nyevelt, whose book, Het Schaakspel, published in 1792, was full of instructive pawn studies.
And whoever thinks that this kind of positions never occurred on the board can check the game Takacs (2206)-Juracsik (2266), Hungary (!!), 2008 with a perfect play from White even before he entered the pawn endgame (5-men tablebase proof), a very interesting one and identical to this puzzle at the 69th move!
Perfectly played endgame in nowadays tournament conditions is worth mentioning.
Hi Susan Polgar,
Well,White can extend/offer a draw,if not accepted the game ends in stalemate.
Keeping the puzzle’s question in mind that is “White to move. Is this a draw or loss for white? How should white proceed? “.
Taken stance as White – Game ends in stalemate.
Example
=======
1.Kh3 g5
2.Kg3 Kf7
3.Kh3 Kg6
4.Kg3 h5
5.g*h K*h
6.Kh3 g4+
7.Kg3 Kg5
8.Kg2 Kh4
9.Kh2 g3+
10.Kg2 Kg4
11.Kg1 Kf3
12.Kf1 g2+
13.Kg1 Kg3 Stalemate
Game ends in stalemate
By
Venky [ India – Chennai ]
One point which struck me is if white K is at f4 and black K at f6 (black has opposition) with white to move white plays g5+ which draws since option …. h5 is not available.
So
1Kf3 Kf7
2Kf4 Ke6
3Ke4 Kd6
4Kd4 Now black dare not play
4… Kc6 because of 5Ke5 black will be forced to play 5… h5
6 gxh5 with draw.
Hi (very kind) Venky.
Look better the position.
After:
1. Kh3 Kf7 (no 1… g5)
White loses.
🙂
Best regards
Stef
A more interesting question to ask is what if every man were translated one square to the left with white to move- draw or loss for white? What if every man were translated two squares to the left with white to move- draw or loss?
One of these was a surprise to me.
Dear Venky:
1.Kh3 loses:
1. Kh3 Kd7
2. Kg3 Ke6
3. Kf4 Kd5
4. Ke3 Ke5
5. Kf3 Kd4
6. Kf4 g5+
Or
2. g5 h5
3. Kg3 Kd6
4. Kf4 Kd5
5. Kf3 Ke5
6. Kg3 Kf5
Prof Bhat:
You’re correct, but
1. Kf3 Kf7
2. Kf4 Ke6
3. g5 is a more contorted way to draw the game.
Dear Yancey Ward
Very interesting to do these tests.
You want this position?
3k4/8/5pp1/8/5P2/8/5K2/8 w – – 0 1
(Again a draw).
Or this position?
4k3/8/6pp/8/5P2/8/5K2/8 w – – 0 1
(The White loses).
Best regards
Stef
Stef,
The first one is correct, the second is incorrect. Should have been:
2k5/8/4pp2/8/4P3/8/4K3/8 w – – 0 1
I would have expected them to both be wins for black with white to move. I thought the key feature would have been that, in the original position, black was constrained by being unable to exchange pawns at h5, creating a useless h-pawn ending.
Dear Yancey Ward
Ah ok.
I did not know whether to move a square on the left only the white pieces, or both.
You’re right, it is surprising (especially in the first position) that the white draw.
All very interesting.
Best regards
Stef
Hi Susan Polgar,
Hi Cortex,
“Kh3” is not a lose for White,it leads to stalemate,evn if its played by a moderate chess player.
Cortex,you had said that “Kh3” loses – I differ from your view,you have given an example to support your view but its not to the finish of the game [ In your view,till the lose of White ]
Your 1st Example in reply to mine is incomplete – That is – you have given 6 moves – then jumped to the conclusion White loses – Which will not happen,even if White is a moderate chess player ]
1. Kh3 Kd7
2. Kg3 Ke6
3. Kf4 Kd5
4. Ke3 Ke5
5. Kf3 Kd4
6. Kf4 g5+
7 ????? [ My reply To this,will be “Kg3” and followed as I have given in my earlier post at this title – White will not lose,It will end up in stalemate – What may the Black King do / Where may the Black King moves,the game will end in stalemate – if White doesn’t move its pawn(moves only for an exchange) and White King just stays besides its pawn,irrespective of Black King’s movement,then proceeds as I have given in my earlier post at this title of the puzzle]
Your 2nd Example in reply to mine is an hypothetical situation,Which even a moderate chess player will never opt.
That is – When the first move of both the players are
1.Kh3 Kd7
2.g5[ Is the bad move,not even a moderate chess player will opt it] – The possible correct 2nd move for White,at this position is “Kh4” – Which in fact,it can turn to White’s advantage,if Black comments mistake.
By
Venky [ India – Chennai ]
Hi Susan polgar,
Hi Cortex & Stef.
This is my third post at this title.[ Still,I couldn’t see my second post in this page at this point to time but posting the third,just to correct the typo error occurred in my second post ]
Cortex & Stef – you both felt that “Kh3” leads White to lose but my view differ from you both.
To me,If White is a cautious player then this games ends with stalemate/draw.
Cortex,your 1st example reply,to my 1st post :
1. Kh3 Kd7
2. Kg3 Ke6
3. Kf4 Kd5
4. Ke3 Ke5
5. Kf3 Kd4
6. Kf4 g5+
7.???????? [ My reply – on the 7th move will be “Kf3” ]
In my second post,at white’s 7th move,the typo error was “Kg3” instead of “Kf3” ]
Cortex your 2nd example reply,to my 1st post :
1.Kh3 Kd7
2.g5[ Why should white move its pawn to “g5” – even a moderate chess player will not move that – the correct 2nd move for White at this position is “kh4” ]
=====
If still not convinced,it will be my pleasure to play it out with you,at this page.
If interested you can reply with Black’s 7th move,as a continuation to the above given seven moves.
By
Venky [ India – Chennai ]
Dear Venky.
I did not understand very well (I hope I do not misunderstand me).
The position that you want to check is this?
1. Kh3? Kd7
2. Kg3 Ke6
3. Kf4 Kd5
4. Ke3 Ke5
5. Kf3 Kd4
6. Kf4 g5+
7. Kf3
After 7… Kd3
The Black wins because he has made to circumvent with the opposition. So the pawn g4 falls.
example after 7… Kd3
7… Kd3
8. Kf2 Ke4
9. Kg3 Ke3
10. Kh2 Kf2
11. Kh3 Kf3
12. Kh2 Kxg4 The Black wins.
If I did not understand your comment I apologize in advance.
Ciao
Best regards
Stef
Venky,
Let’s deal with your first contention with Cortex with the following line you provided:
1. Kh3 Kd7
2. Kg3 Ke6
3. Kf4 Kd5
4. Ke3 Ke5
5. Kf3 Kd4
6. Kf4 g5+
7. Kf3
The quickest way for black to win is to use the control of f4 and h4 against the white king, and force him away from the g-pawn. The method is as follows:
7. …..Kd3
8. Kf2
Or white can try [8.Kg3 Ke3 9.Kg2 (or 9.Kh3 Kf3 10.Kh2 Kg4-+; or 9.Kh2 Kf2! 10.Kh3 Kf3 11.Kh2 Kg4-+) 9. …Kf4! 10.Kh3 Kf3 11.Kh2 Kg4-+]; or [8.Kg2 Ke4 9.Kg3 Ke3 10.Kh3 Kf4 11.Kg2/h2 Kg4-+]. Continuing:
8. …..Ke4 (threatens Kf4)
9. Kg3 Ke3 (taking opposition)
10.Kh3
Or [10.Kg2 Kf4 11.Kh3 Kf3 12.Kg2/h2 Kg4-+]; or [10.Kh2 Kf4 11.Kh3 Kf3 12.Kh2 Kg4-+]. Continuing:
10. ….Kf3 (taking the opposition)
11.Kh2 Kg4 and black wins.
White is helpless in the position. The black king gets in under the white pawn’s control of f5, while his own pawn constrains white’s protection of his g4 pawn by controlling the key squares of f4 and h4- just note how in all the lines I described that the white king is forced away from the pawn because he could not access h4.
Your second contention with Cortex is meaningless. He was just showing you that it doesn’t matter what white does, he will lose after 1.Kh3, and Cortex was correct.
Dear all,
you’re missing the whole point of Grigoriev study:
Okie, 1.Kf3 is the right move.
But Black can play, instead of the rather flat 1…Kf7, other moves.
1…Ke7, and above all the venomous strike
1…Kd7!?
After 1…Kd7, all White’s moves loses, except, of course, one.
Which one?
Hi Susan Polgar,
Hi Stef,
Much appreciated – Thats a bright light on the issue – Thanks for the reply.
Being humble when you are correct is really a great attitude – Stef, you possess that attitude – Much appreciated again.
As well,I appreciate all those who had taken initiative to emphasize the draw back of “Kh3” to me – Thanks.
By
Venky [ India – Chennai ]
Hi Venky.
Thanks for the kind words.
I think you’re a special person.
Ciao.
Best regards
Stef
Hi Venky,
sorry if I was dry in criticism and not as quick as Yancey Ward and Stef to explain you in words why 1.Kh3 was wrong.
Nevertheless, your interventions are appreciated. Keep going with’em!
And 1.Kh3 is not that easy to refute.
Dear Cortex.
You’re right, line 1. Kf3 Kd7 2. g5 is the most beautiful.
I have followed other roads. Maybe because I’m more of a chess tournament player and less prone to solve chess problems. (perhaps even Yancey Ward).
But yeah, 1. Kf3 Kd7 2. g5 is a line full of refinement.
Best regards
Stef
Per Cortex’s comment:
1. Kf3 Kd7
2. g5 h5
Here, hg5 or any king move is a trivial draw if you have followed any of comments I wrote above. Also, the pawn push h5 is also a cousin of the very first line I discussed in my first comment (though I just now realized I made a typo with white’s third move). Now, why did Cortex find this line fascinating? Probably because white’s 3rd move is also an only move:
3. Ke3!
Why this move? White absolutely must take the direct opposition on the 4th rank if the black king comes to e6 or d6 on the third move. If he doesn’t, he will lose. Let’s look at a line where white does not move such that he can play to d4 or e4 on his 4th move:
3. Ke4?? Ke6! (taking opposition)
4. Kf4 Kd5
And now we can see why it was absolutely critical for white to not allow the black king to come to the sixth rank and take the opposition for himself- after 4.Kf4 Kd5, white cannot reply with 5.Kf5- the black king has gotten “under” the white pawn’s control of f6, but white’s king has not gotten under the black g-pawn’s control of f5, and white’s only defense against this was to have the opposition on move 4. Continuing from move 4 above:
5. Kf3 Ke5
6. Kg3 Kf5
7. Kh4 Kf4 and black wins.
Now, what if, at move 3, white had moved the king to f4 where black could not take the opposition? Let’s see what black has up his sleeves?
3. Kf4?? Kd6!
This is an only move for black to win (the diagonal opposition!). Note what has happened to white. He can’t play his king on move 4 to e4 or e3 without allowing black to take the opposition on his 4th move with Ke6 or Ke5 respectively and winning the game (I leave the details to the curious). If white plays 4.Kg3, black replies with Ke5 (diagonal opposition) and will eventually win g5 as before. If white replies 4.Kf3, black can allow white the opposition by playing Ke5 immediately as the g5 pawn falls if white plays Ke3.
Now, let’s consider what black will do if the white king plays Kg3:
3. Kg3 Ke6
Note that white cannot take the opposition from the 4th rank here. Continuing:
4. Kf4
Trying to cut the black king off from f5, but it is now too late:
4. …..Kd5
And the g6 pawn again constrains the white king who must give way and the g-pawn will fall.
Also at move 3:
3. Ke2 Ke6 (long range opp.)
4. Kf3 Kf5
Or
3. Kg2 Ke6 (coming to f5)
4. Kg3 Kf5
5. Kh4 Kf4 wins for black.
So, let’s return to the main line:
1. Kf3 Kd7
2. g5 h5
3. Ke3!
Now, let’s consider black’s direct approach:
3. …..Ke6 (aiming for f5 square)
4. Ke4!
And now, we see that black has not gotten “under” the white g-pawn’s control of f6. What can black do here? If black retreats to the 7th rank, white can play back to the 3rd rank to e3 or d3, ready to come forward and take the opposition again if black returns to the 6th rank. If black plays 4. …Kd6, white must play 5.Kd4. However, white must not ever enter the c-file as black can then push the h-pawn. Let’s look at these ideas explicitly, then we can restudy the lines in which black pushes the h-pawn. Continuing from move 4 above:
4. …..Kd6
5. Kd4! Kc6 (luring Kc4??)
6. Ke4!
An only move once again (diag. opp). White must remain ready on move 7 to take the opposition at d4 if black plays back to d6. If black plays to c5, white takes the opposition from e5. If black plays to b5, white takes the opposition from d5. If black plays to b6, white takes the diag. opp. from d4 (ready to take the direct opp. if needed based on black’s further moves). If black plays to c7, white has more options, but the most easily understood is to just take the diagonal opposition from e5. If black plays to b7, white just takes the diagonal opposition from d5 (of course, white cannot be allowed to be lured to the 6th rank either as h4 again wins).
Cont in next comment.
In my previous comment, I had discussed this critical line that was of interest to Cortex:
1. Kf3 Kd7
2. g5 h5
3. Ke3 Ke6
4. Ke4 Kd6
5. Kd4 Kc6
In this line, black is tempting white to play Kc4, but white would lose as this would allow black to push his pawn. Without a waiting move, black cannot drive white off the effective opposition between ranks 6 and 4, and cannot drive white off the oppositions across the files either. Now, black can play a waiting move by pushing h4. I actually described such lines the other night in my previous comments, but let’s look at those in the context of these critical lines. First, let’s consider the possibility of luring the white king to the maximum distance from h1 before pushing the pawn. Picking up the line from above:
6. Ke4
Taking the diagonal opposition. Now black can lure white even further away with
6. …..Kb7
7. Kd5
Keeping the the diagonal opposition on black. White can still draw with moves like Ke3, Ke5, and Kd3 (details left to the curious as I have already described everything you need to work out the right lines for white to draw by maintaining effective control of the black king). Here, I just want to illustrate a line in which black pushes h4 with the white king the maximum distance from the queen square. Continuing from move 7 above:
7. …..h4
8. Ke4
The only moves here for white are along the h1/a8 diagonal as long as black keeps pushing the pawn. However, if black pushes the h-pawn, it means he doesn’t get his king closer to the remaining pawns, so it is a double edged sword for him. Continuing:
8. …..h3
9. Kf3 h2
10.Kg2 h1Q
11.Kh1 Kc6
12.Kg2 Kd5
13.Kf3 Ke5
14.Kg3 Kf5
15.Kh4 Kf4
16.Kh3 Kg5
17.Kg3
So, in the moves from 11 to 16, I made no comments, but comments weren’t necessary. White can’t stop black from winning the g5 pawn, but the resulting position is a dead draw as long as white keeps himself prepared to play Kg3 immediately after black captures at g5, and black must capture at g5, so there is no way black can prevent white from taking the opposition as he did at move 17. In fact, it won’t matter when black pushes the h-pawn- white will win it at some square on the h-file, and sit waiting for black to play Kg5. Let’s look at a line where the black king is much closer to the g5 pawn when h4 is pushed to demonstrate that it simply won’t matter:
1. Kf3 Kd7
2. g5 h5
3. Ke3 Ke6
4. Ke4 h4
5. Kf4
This is an only move for white. He must keep f5 under control here until black has pushed to at least h3. If, for example, white played Kf3 here, black plays Kf5 and will win g5 while retaining the h-pawn. Continuing:
5. …..h3 (nothing else now)
6. Kg3 Kf5 (h2 7.Kh2 Kf5 8.Kg2=)
7. Kh3 Kf4 (Kg5 8.Kg3=)
8. Kh4 Kf5
9. Kh3
Of course, 9.Kg3 loses to Kg5 as black captures while taking the opposition.
I shouldn’t have to demonstrate the draw to the stalemate/pawn loss since I have done that already in earlier comments.
Well, Yancey Ward, and well done! But if Black tries 3…Ke7, what next? Again an unique move is to be discovered.
(Black will try to use queenside squares to approach his pawns)
This study evokes me strongly the vision of a watchdog who defends his house, even if the chain is to short to chase the intruder…
SPOILER:
____________
PS: Here is the beforementioned game snippet:
7k/6pp/3K4/6P1/8/8/8/8 b – – 0 59
After Black has not played winning moves in the transition between middlegame and endgame (and especially in zeitnot!), we reach this interesting pawn endgame.
(Unique moves are marked with a “!”)
59…Kg8
60. Ke6 Kf8
61. Kf5! Ke7
62. Ke5 Kf7
63. Kf5! g6+
64. Ke5 Ke7
65. Kd5! (trivial, but… still only move) Kf8
66. Ke5 Kf7
67. Kd5 Kg7
68. Ke5 h5
69. Ke4 Kg8
70. Kf4 Kf7
71. Kf3 (now, let’s appreciate Black’s effort to win, forcing White to find the only move that doesn’t lose, and not in a correspondance game…) Ke7
72. Ke3! (not so trivial. Concepts like distant opposition don’t apply fully with material imbalance) Kd7
73. Kd3! Kc7
74. Ke3! (White can’t get out of h-pawn square but this move still holds) Kb6
75. Kd4! Kc6
76. Ke4! Kd6
77. Kd4! h4
78. Ke4! Ke6
79. Kf4! h3
80. Kg3! Ke5
81. Kxh3 Kf5
82. Kh4 Kf4
83. Kh3 Kxg5
84. Kg3 (trivial. now it is dead draw) Kf5
85. Kf3 Kg5
86. Kg3 Kh5
87. Kh3 and 1/2-1/2
Endgames and studies are worth studying to have those kinds of automatism, critical when you don’t have much thinking time left.
Cortex,
I consider that line a subset of the Kd7 line (I actually did take a peak at it last night and decided that I would mostly duplicate work). True, it is amazing to me, too, that white found the only moves each time in that game- not an easy thing to do. Many players might well have exchanged the pawn at h6 en passant and lost quickly.
Your note on move 72 about distant opposition is a bit confusing: while that is always possibly true in materially imbalanced games, those positions after white moves 72 and 73 are distant oppositions- the pure definition of which is that white retains the option of taking the direct opposition (across one square) if the opponent king moves forward to any of the three squares in front of him.
Of more interest to me is white’s 74th move. I actually studied that position while analyzing the 1. …Kd7 line last night, but left the details to the curious. It is what I would term a long distant diagonal opposition, or even a hybrid long distant/diagonal opposition. Note that white retains the option of taking a diagonal opposition if black moves to b6 or c6, retains the option of taking the direct opposition if black moves to d6, of taking the long distant opposition if black moves to d7, and of taking this hybrid opposition if black moves to b7 (by moving to d3-an only move!), and if black retreats to the 8th rank, white gains multiple drawing options and can just wait for the black king to advance again before facing him down.
Your analogy of the dog on the chain was brilliantly correct!